Avoid Common Indoor Seed Starting Mistakes: Tips and Supplies for Novice Gardeners Year-Round
Indoor gardening can be fun and rewarding, but many novice gardeners make common indoor seed starting mistakes. This guide shows you what those mistakes are, how to avoid them, and why they matter for your plants. By learning simple tips for seasonal planting and care, you can grow healthy seedlings year-round. Let’s get started on your journey to becoming a better gardener.
Avoid Common Indoor Seed Starting Mistakes: Tips and Supplies for Novice Gardeners Year-Round
Create Your Indoor Garden Oasis
Starting seeds indoors can be exciting, especially if you don’t have outdoor space. You can grow fresh vegetables, herbs, and flowers right on your kitchen counter or a sunny windowsill. Here are some essential indoor seed starting tips for beginners with no garden:
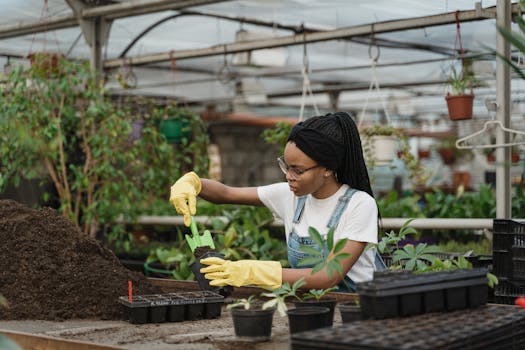
Choose the Right Containers: You can use small pots, seed trays, or even recycled containers like egg cartons. Make sure they have drainage holes to prevent overwatering. (Yes, nobody wants soggy seeds!)
Select Quality Seed-Starting Mix: Use a light, fluffy seed-starting mix instead of regular garden soil. This mix helps seeds germinate better and reduces the risk of diseases.
Find a Bright Spot: Place your containers in a spot that gets plenty of sunlight. A south-facing window is ideal. If you don’t have enough natural light, consider using grow lights.
Water Wisely: Keep the soil moist but not soaked. Water from the bottom by placing the containers in a shallow tray of water. This method helps prevent overwatering and keeps the soil evenly moist.
Label Your Seeds: Use popsicle sticks or labels to mark what you plant. It’s easy to forget, and you don’t want to confuse your tomatoes with your basil!

Following these steps will help you create a thriving indoor garden oasis, even without a yard.
Plan Your Planting for Continuous Harvest
To enjoy fresh produce all year, you need an indoor seed starting schedule for year-round gardening. Here’s how to plan your planting effectively:
Research Planting Times: Different plants have different growing seasons. For instance, tomatoes and peppers are best started indoors 6-8 weeks before the last frost date. On the other hand, leafy greens can be sown every few weeks for a continuous harvest.
Create a Planting Calendar: Write down when to start each type of seed. Here’s a simple example:
- January: Start onions and leeks.
- February: Begin peppers and tomatoes.
- March: Start lettuce and herbs.
Rotate Your Crops: To keep your indoor garden productive, rotate your crops. After harvesting, plant something different in the same container to maximize space and nutrients.
Monitor Your Growth: Pay attention to how your plants are doing. If they are growing too quickly or too slowly, adjust your watering or lighting.
By planning your planting, you can ensure that you always have something growing in your indoor garden.
Equip Yourself for Success
Having the right supplies makes a huge difference in your indoor gardening success. Here’s a list of must-have indoor seed starting supplies and lighting solutions:
Containers: As mentioned before, select pots or trays with drainage holes. These can be plastic, ceramic, or biodegradable options.
Seed-Starting Mix: This soil is lighter than regular soil and helps seeds germinate. Look for a mix that contains peat moss, vermiculite, or coconut coir.
Watering Can: A small watering can or spray bottle works well. Avoid using a garden hose, as it can flood your containers.
Grow Lights: If you can’t provide enough natural light, invest in some grow lights. LED lights are energy-efficient and provide the right spectrum for plant growth.
Thermometer and Hygrometer: These tools help you monitor the temperature and humidity in your indoor garden. Most seeds prefer temperatures between 65-75°F.
Additional Gardening Tips
To further enhance your indoor gardening experience, consider exploring beginner gardening tips that can provide more insights into successful practices. With the right knowledge and tools, you can cultivate a flourishing indoor garden in no time!
- Labels: Keep your seed packets organized, and use labels to mark your containers. This organization helps you keep track of what you’ve planted.

Investing in these essential supplies will set you up for success as you start your indoor garden.
Overcome Winter’s Chill with Indoor Germination
Germinating seeds indoors during winter can be a challenge, but with the right approach, you can thrive. Here’s a step-by-step guide to successfully germinating seeds indoors in winter:
Choose Cold-Hardy Seeds: Select seeds that can handle cooler temperatures. Good options include kale, spinach, and radishes.
Set Up Your Indoor Environment: Keep your indoor temperature consistent. A small space heater can help if your home is particularly chilly. Aim for temperatures between 65-75°F.
Use Heat Mats: Consider investing in seedling heat mats. These mats provide gentle warmth from below, which helps seeds germinate faster.
Water Carefully: Be careful not to overwater. Check the soil daily and water only when the top inch feels dry.
Provide Adequate Light: Ensure your seedlings get 12-16 hours of light daily. If using grow lights, place them about 2-4 inches above the seedlings and adjust as they grow.
Thinning and Transplanting: Once your seedlings have a few sets of true leaves, thin them out to prevent overcrowding. You can transplant them into larger pots if needed.
For example, a novice gardener named Sarah started her indoor garden in January. By following the above steps, she successfully grew kale and radishes, enjoying fresh salads all winter long. (Talk about a winter win!)

By implementing these steps, you can enjoy vibrant growth even during winter’s chill.
Mastering Indoor Seed Starting for Vibrant Growth All Year
As you embark on your indoor gardening journey, remember that avoiding common indoor seed starting mistakes can lead to a thriving garden. Focus on creating the right environment, planning your planting, equipping yourself with the necessary supplies, and following the steps for winter germination.
With clear guidance and a little practice, you can enjoy the satisfaction of growing your own indoor herb garden, vegetables, and flowers year-round. Additionally, seasonal indoor gardening tips can provide you with further strategies for success. Happy gardening!
FAQs
Q: How can I adjust my indoor seed starting schedule to ensure healthy seedlings, especially when I don’t have a garden to transplant them into immediately?
A: To adjust your indoor seed starting schedule, start by timing your seed planting so that the seedlings are ready for transplanting when outdoor conditions are optimal, typically after the last frost. If you don’t have a garden to transplant them into immediately, consider potting them up into larger containers and providing adequate light, warmth, and moisture to ensure they remain healthy until you can move them outside.
Q: What are the crucial lighting considerations for indoor seedlings, and how do I avoid common pitfalls when I don’t have access to grow lights?
A: When growing indoor seedlings without access to grow lights, ensure they receive adequate natural light by positioning them near south-facing windows for maximum exposure. Avoid common pitfalls such as insufficient light duration (at least 14-16 hours daily) and inadequate light intensity; consider using reflective surfaces to enhance light availability.
Q: With limited space for supplies, what are the most essential tools for successful indoor seed starting, and how can I avoid overcomplicating the process?
A: The most essential tools for successful indoor seed starting include quality pots or containers with drainage holes, potting soil, and a watering can with a long spout. To avoid overcomplicating the process, stick to the basics: use simple, repurposed materials for containers when possible, keep your watering routine consistent, and focus on a few easy-to-grow seeds to start.
Q: How can I effectively germinate seeds indoors during winter without making the common mistake of stunted growth due to temperature variations?
A: To effectively germinate seeds indoors during winter, maintain a consistent temperature between 65-75°F for optimal growth, as temperature fluctuations can lead to stunted growth. Use a heat mat to ensure even warmth and consider placing a Styrofoam insulation barrier under your containers to prevent cold from affecting the roots.